
One Room Challenge Week 8 – The Reveal
It’s the end of Week 8 and our Spring 2020 One Room Challenge participation is coming to an end. I’m so happy Linda Weinstein created this event! It gave us the encouragement and motivation we needed to buckle down and complete our master bedroom makeover!
This post contains affiliate links and I will earn a commission, at no extra cost to you, if you make a purchase using any of them.

If you’re now joining us and you’re unfamiliar with this event, here’s what it’s all about. Each Spring and Fall, 20 Featured Designers are selected by Linda Weinstein and the ORC team for a 6-week challenge where they each take us along on their room transformation! Feeling inspired? Guest Participants, like yours truly, with a blog or Instagram account can register and join in on the action. This year, however, due to the COVID-19 pandemic the challenge included an additional 2 weeks of work time which was so helpful for newbies like me and Hubby!
Master Bedroom Makeover – The Before Views
Let’s take a stroll down memory lane! I still can’t believe that just 8 weeks ago, this was OUR bedroom! Looking back at this photo, I have a true sense of appreciation for how far we’ve come and all we were able to accomplish as a TEAM!

For more details on individual DIY projects, we completed as part of our master bedroom makeover, check out the following One Room Challenge Weekly Updates :
Week 1 || Week 2 || Week 3 || Week 4 || Week 6 || Week 7

Master Bedroom Makeover – The Reveal
I’m experiencing many EMOTIONS right now my friends! I’m beyond EXCITED to share our master bedroom makeover with you all and I’m so incredibly PROUD of the time and work Hubby and I have put into this project! I hope you LOVE it as much as we do! I’m OBSESSED with how well our DIY shiplap wall turned out! I think the dark, moody vibe is absolutely perfect, and just what this space needed! Sherwin Williams Iron Ore has never let me down and it delivered once again!


Faux Window Trim
So believe it or not, our initial plan for this wall with the large window was just to add some shelving. We figured with all the other updates we were doing, this wall could be kept simple and minimal, however, our plans quickly evolved!

In addition to shelving, we repainted the wall in Sherwin Williams Pure White. Just to keep it interesting, we also created this faux window trim using Sherwin Williams Iron Ore. I’ve always loved the added dimension window trims created, but I knew that wasn’t a project we’d be embarking on … not now anyway! The painted trim was the next, best thing and I scoured Pinterest looking for inspiration but found none. So remember my friends, you saw this PAINTED (FAUX) WINDOW TRIM here FIRST!
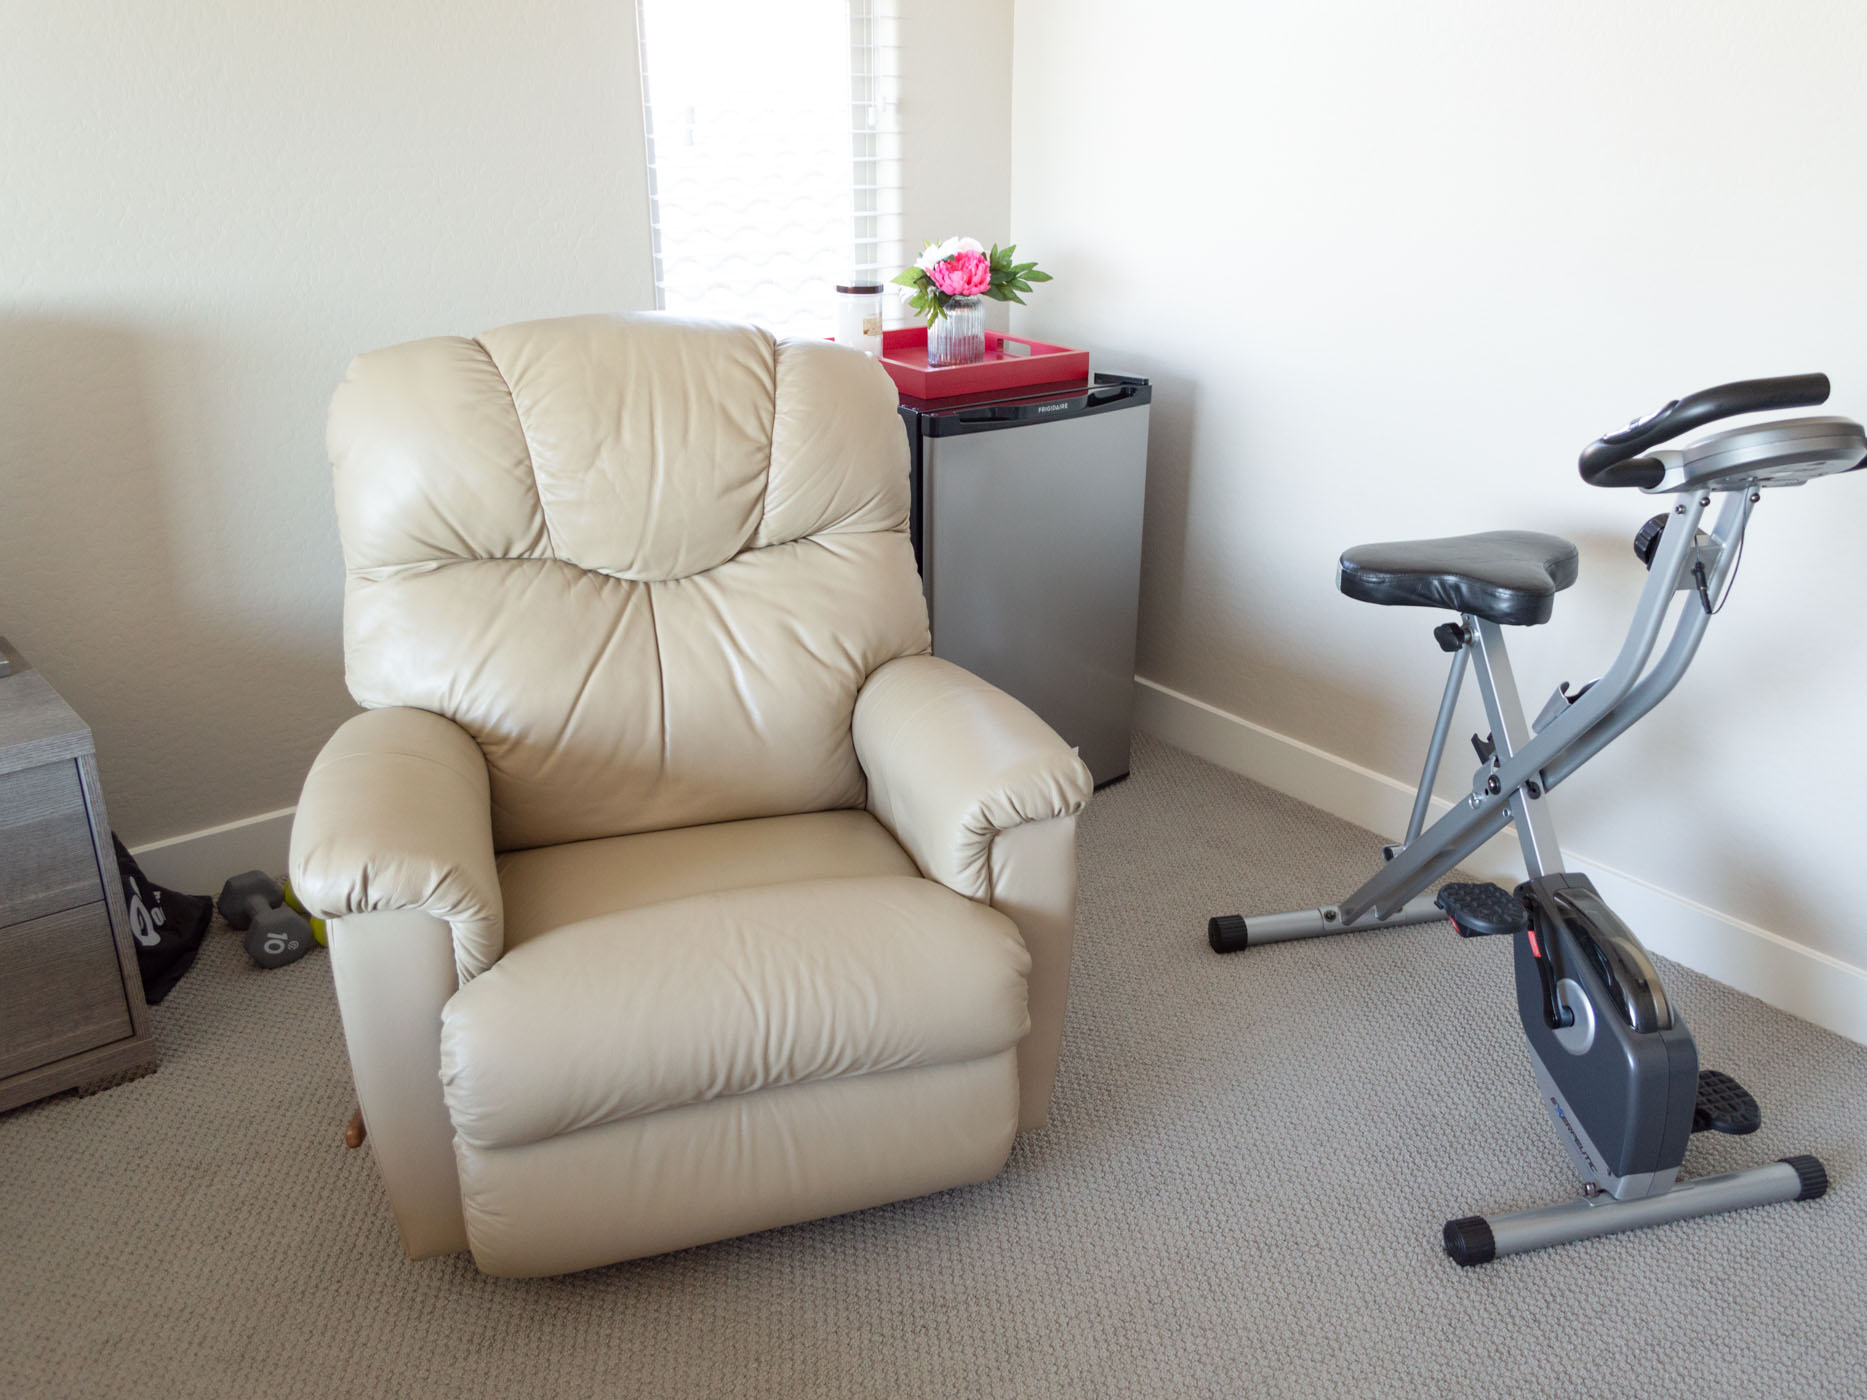
Cozy Corner
My plan for this corner was to add warmth, layers, and coziness. I wanted to create a little area suitable for reading, working, or just hanging out with a cocktail. I think we achieved our goal for this space. They’re so many beautiful details I adore here and I look forward to many comfy moments! I actually shopped my home for these pillows because the ones I ordered from Crate&Barrel didn’t arrive in time. I’m living for them in this space so maybe I’ll just leave them be!

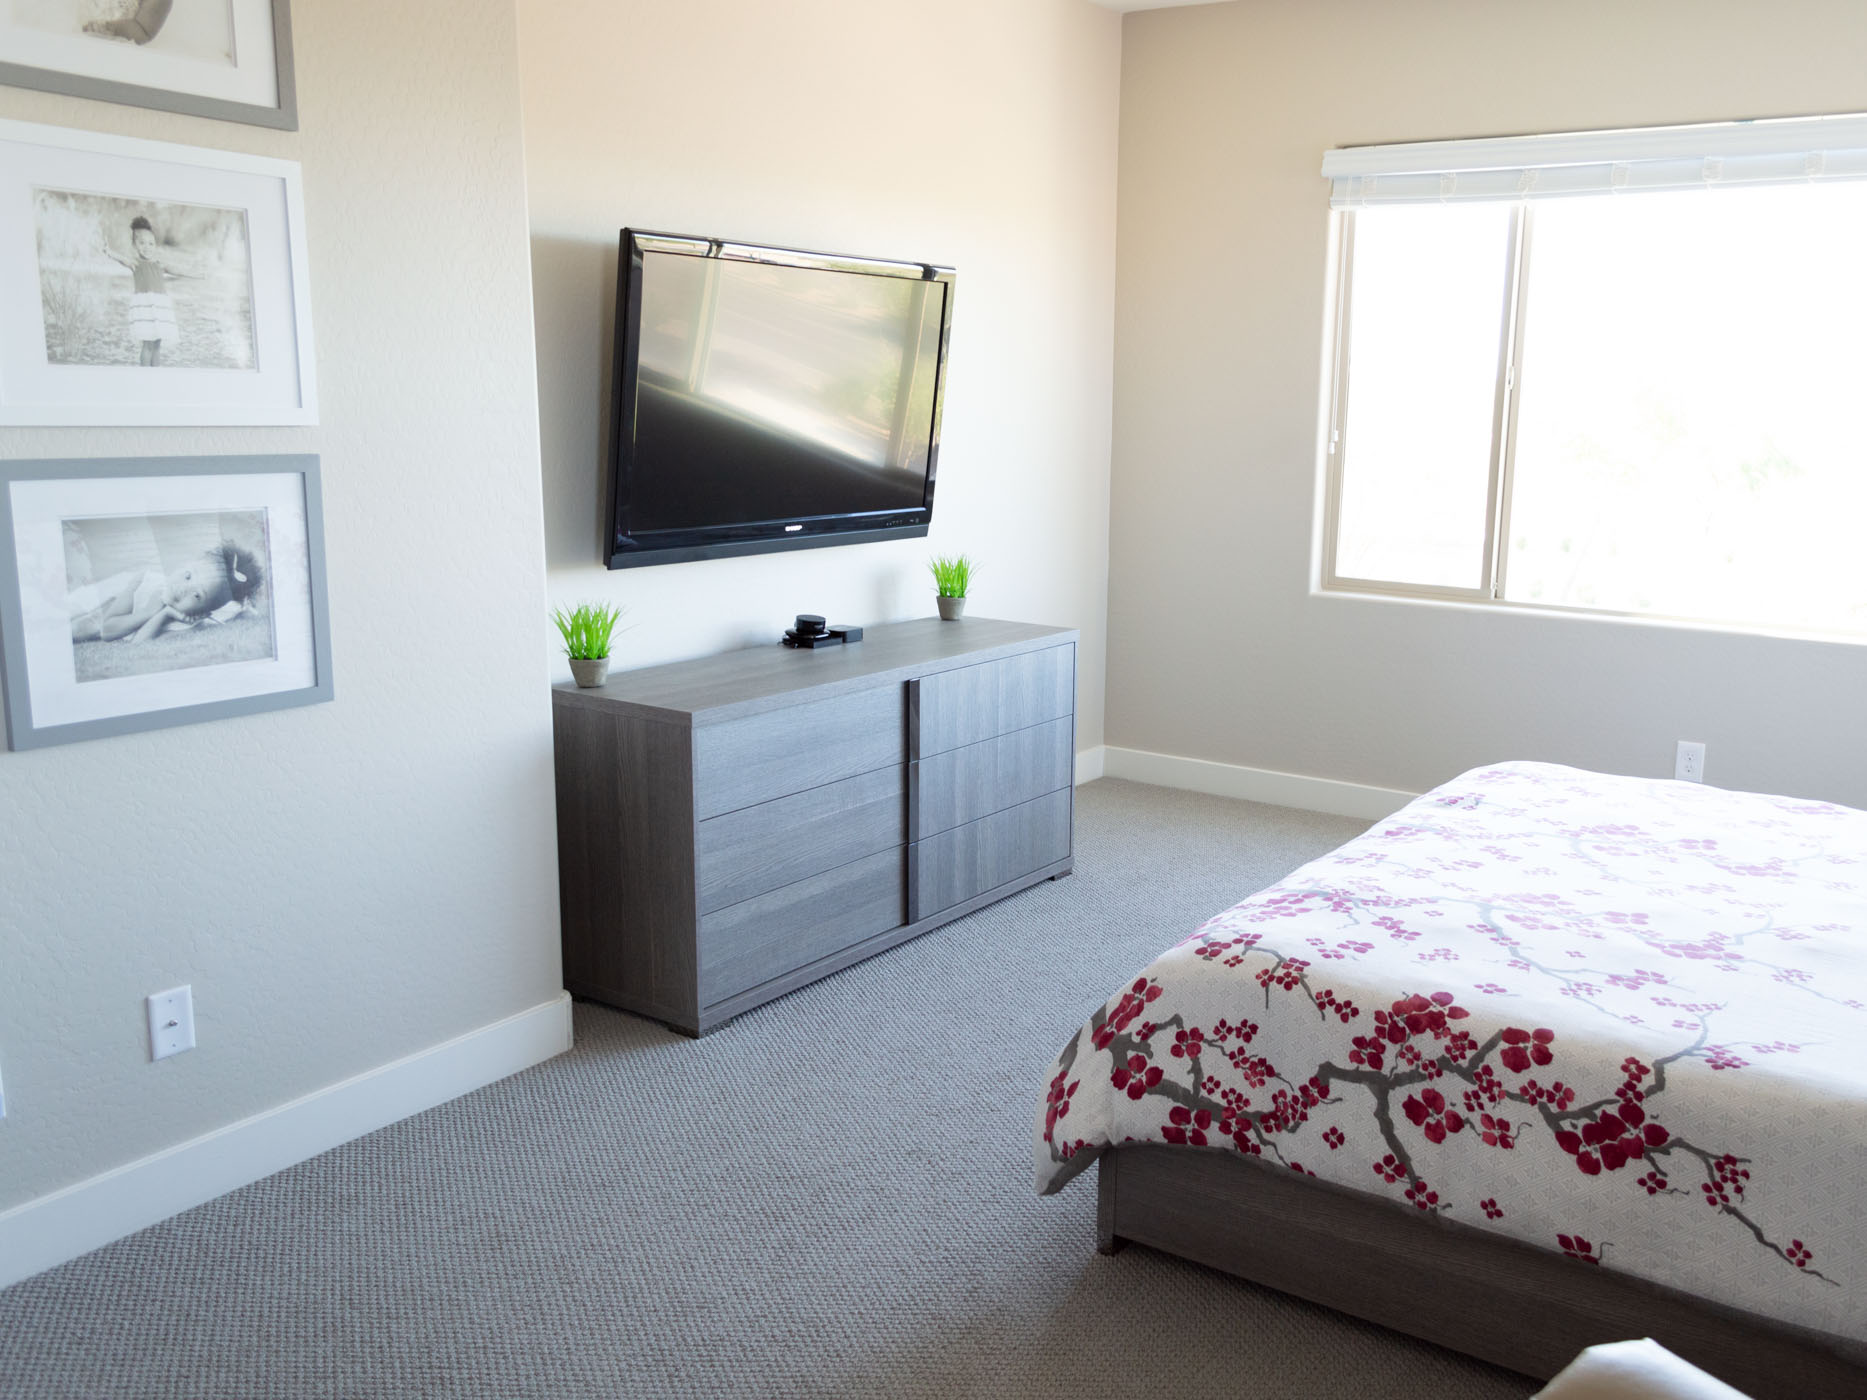
Color Block Accent Wall
I know in the home decor world, displaying one’s TV is a hot topic! Personally, I have no qualms showcasing my 75″ TV, however, she needed to be dressed up first! When we decided to paint a color block accent wall, our original plan did not include the space behind our TV. However, after painting the first half of this 19 ft wall, we soon saw how incomplete this space looked. Extending the color block wall behind our TV was a smart decision. Now our TV isn’t the only interesting thing in this view! And yes, that is a mini-fridge! I like to keep my ice cream close!


Night Stand Decor
I intentionally kept our nightstand decor minimal and yes, we have no lamps! Our bed has a built-in light that provides the perfect ambiance, so although we could have purchased lamps for aesthetic purposes, we chose practicality … this time! These little, ceramic trays are perfect for your TV remote, phone, and jewelry. We keep a couple of coasters in ours for those WINE down evenings!


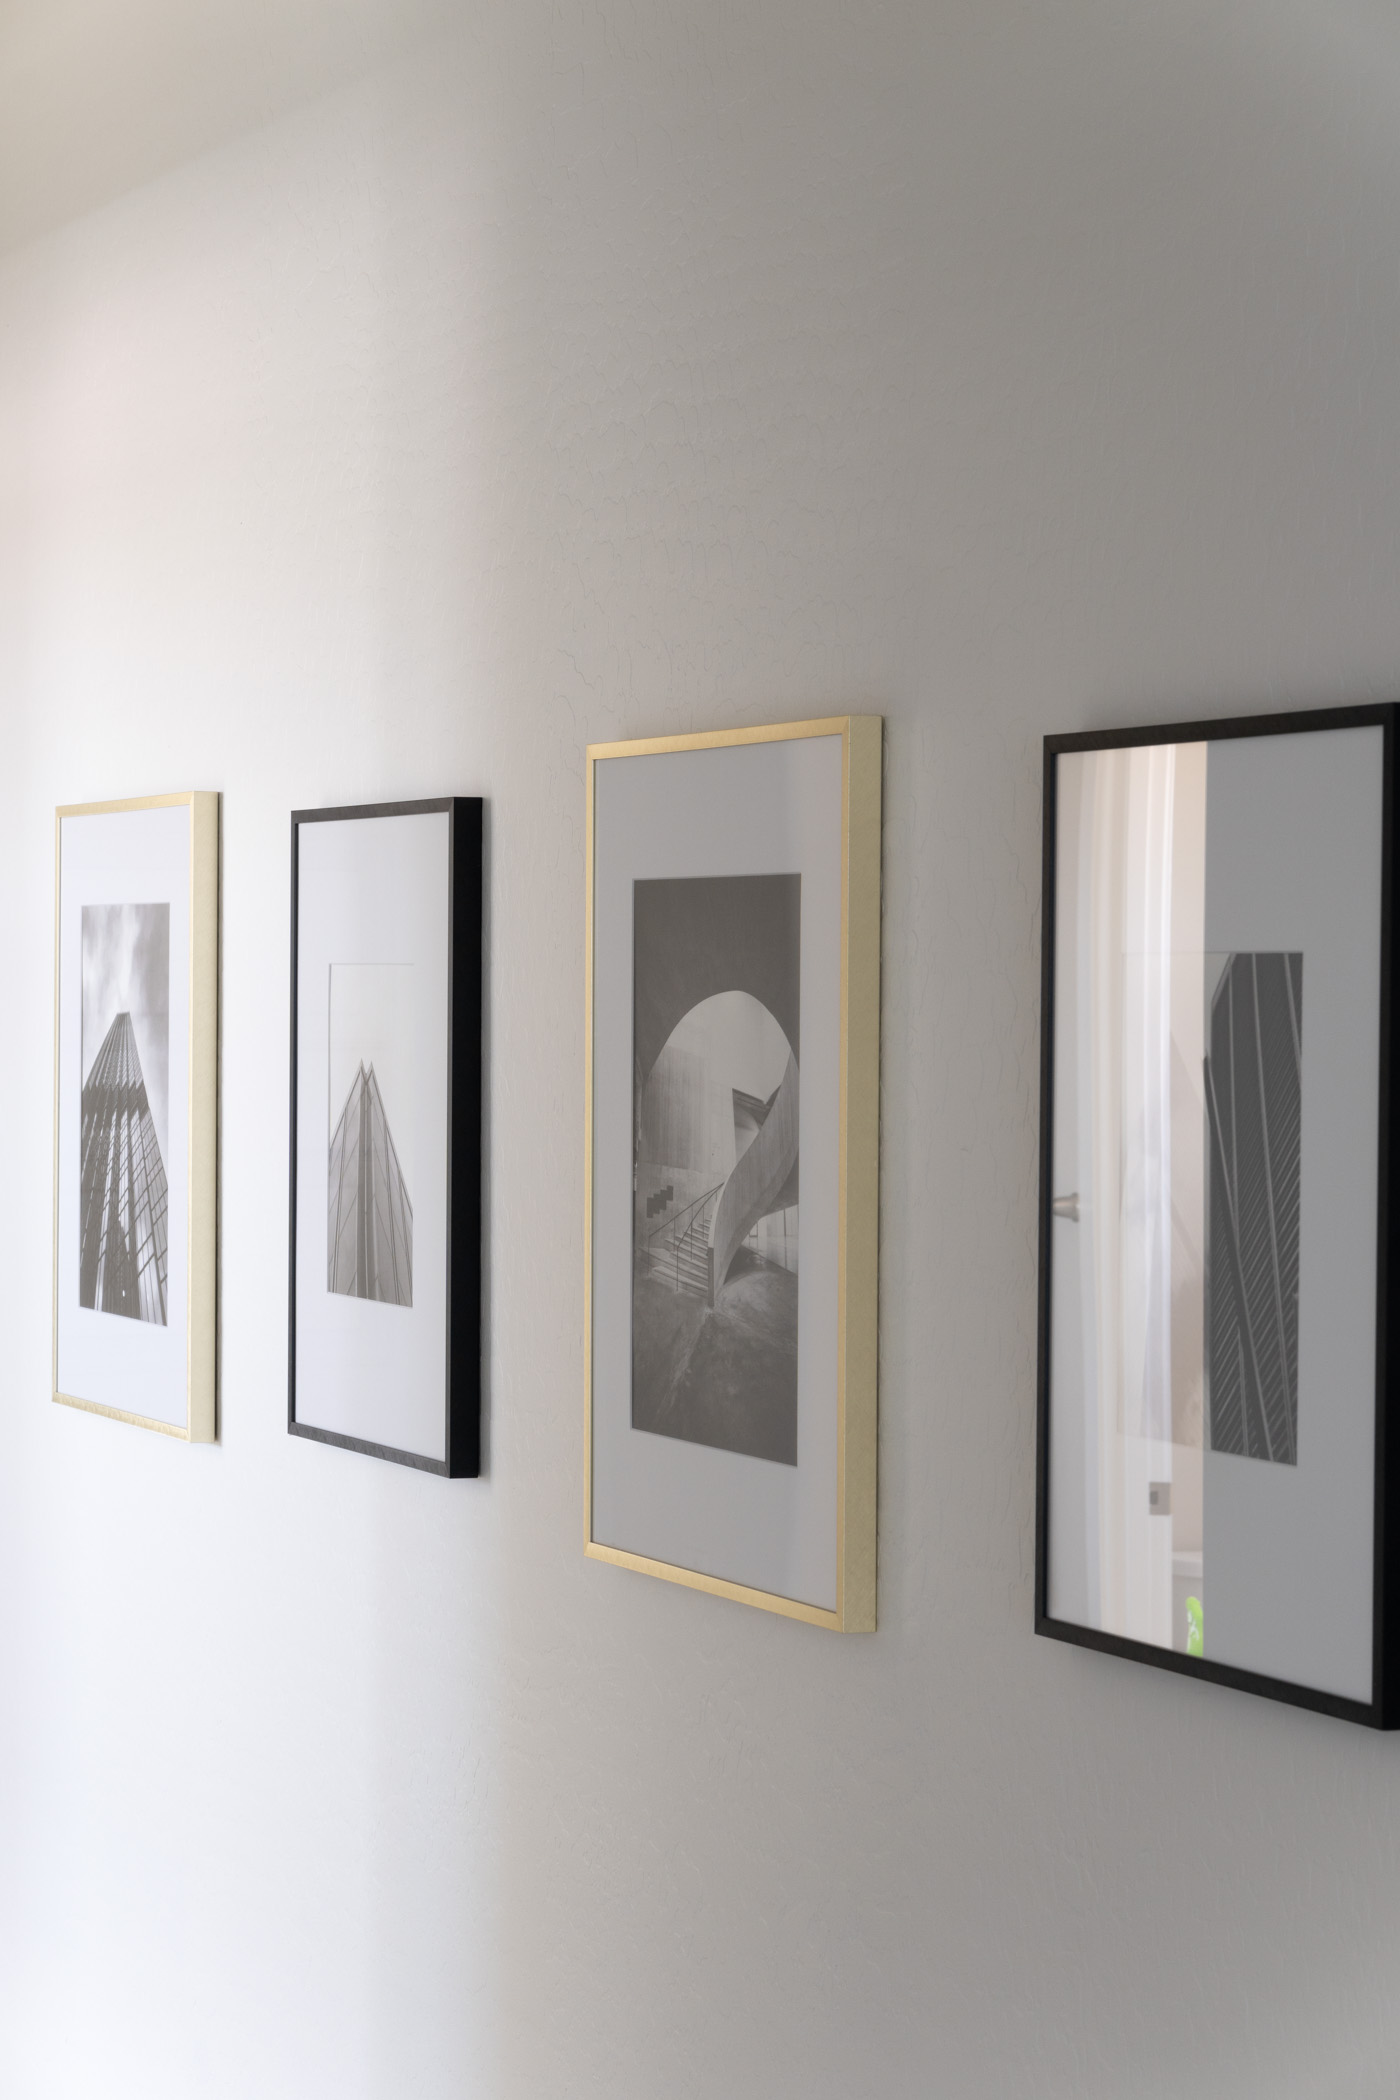
Gallery Hallway
I’m so glad Hubby suggested we create a hall of frames. As much as I enjoy looking at these white walls, the black and gold metallic frames break up the white and provide some ease to the eyes. I’m also digging the black and white, architectural prints we selected! It appears we’ve created our very own little art gallery!

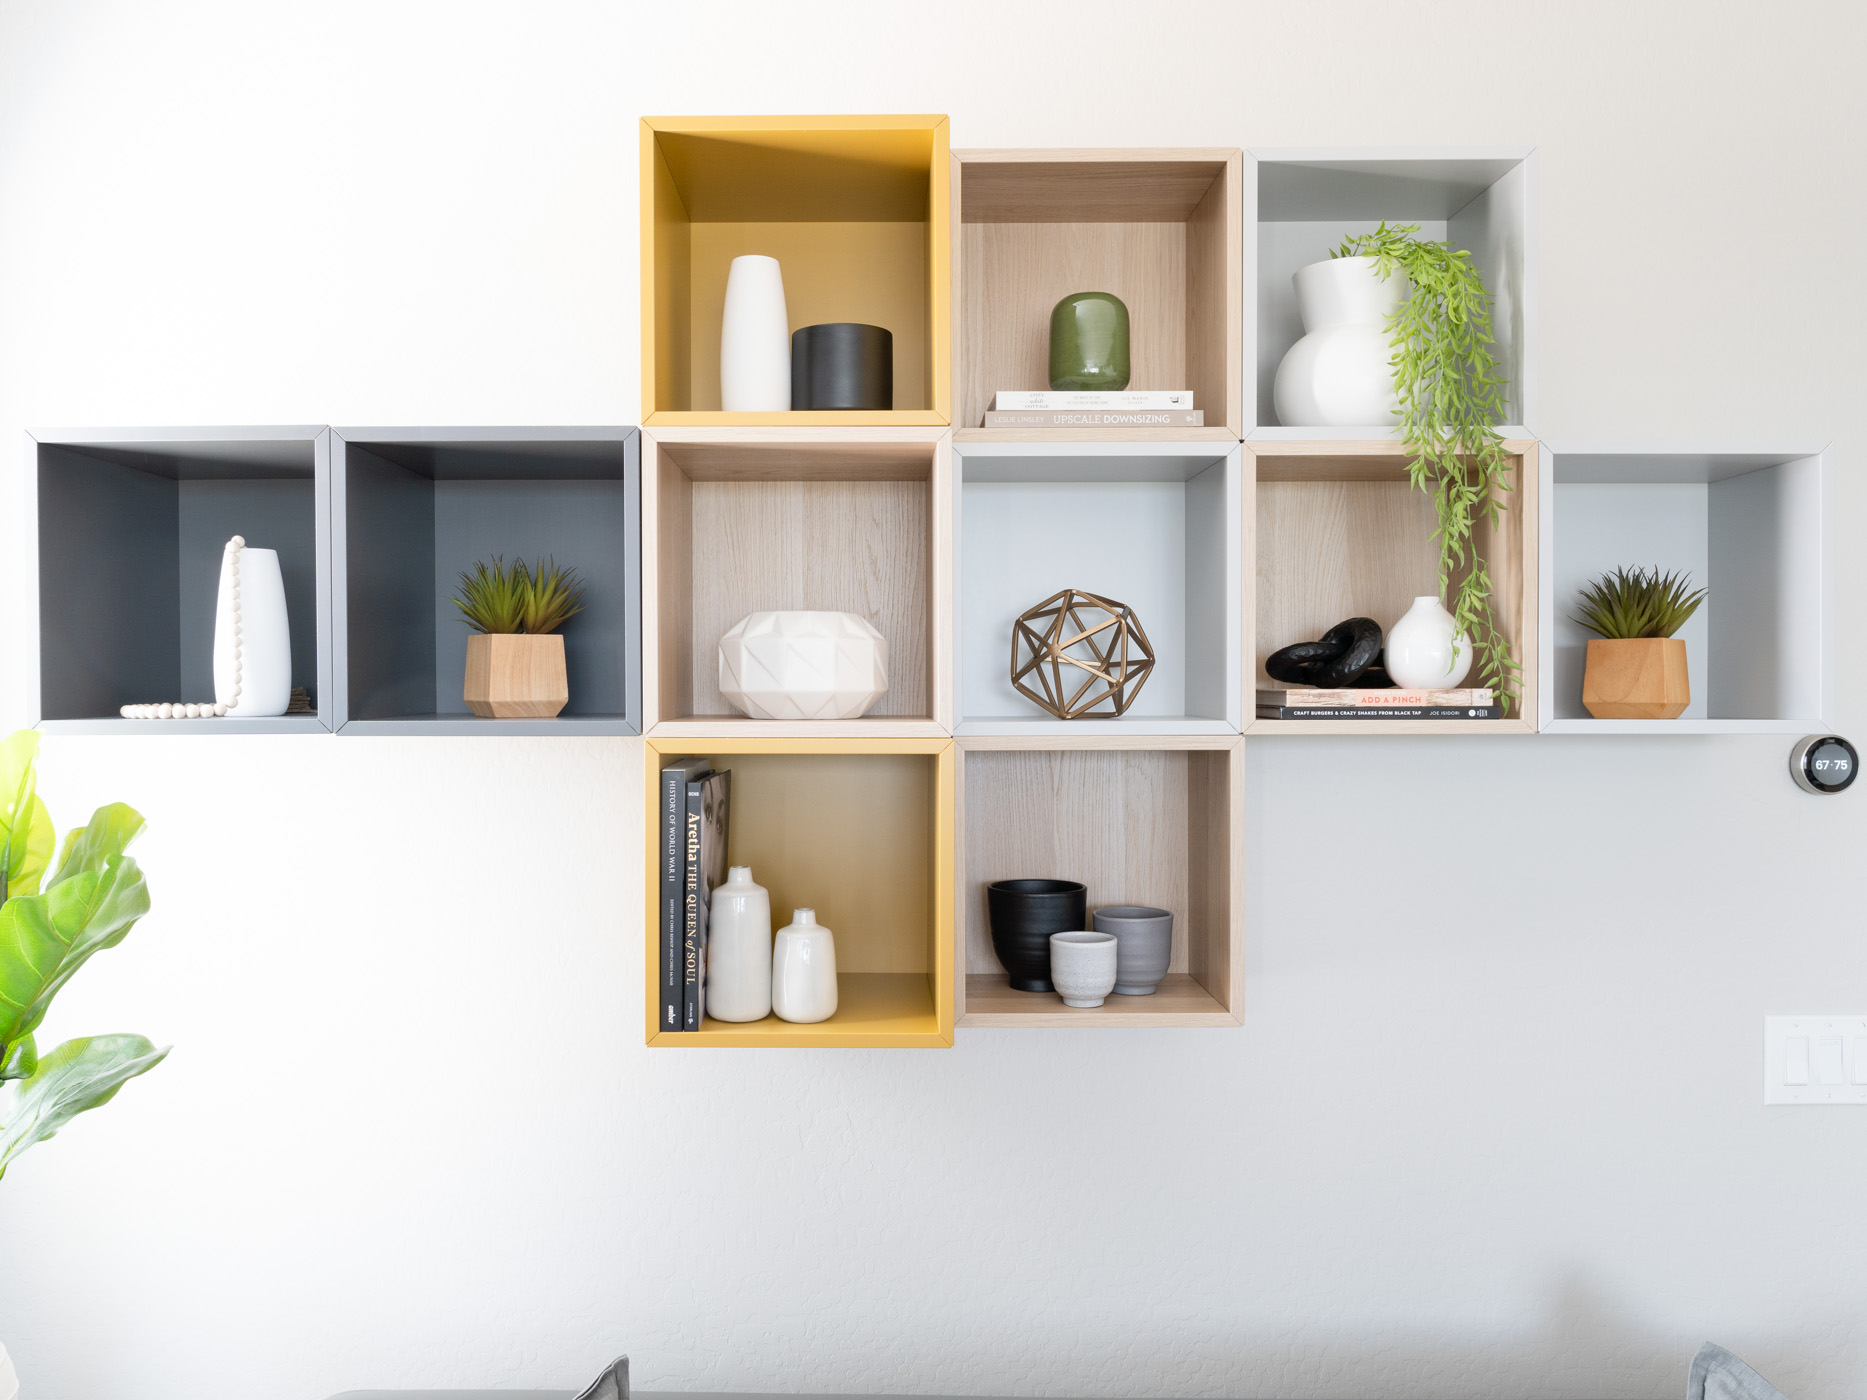
IKEA Storgage Cubbies
I love collecting decor pieces of various textures and styles! Vases, books, and greenery are some of the go-to styling items that have never let me down. These cubes have so much styling potential and I look forward to playing around with them in the future!

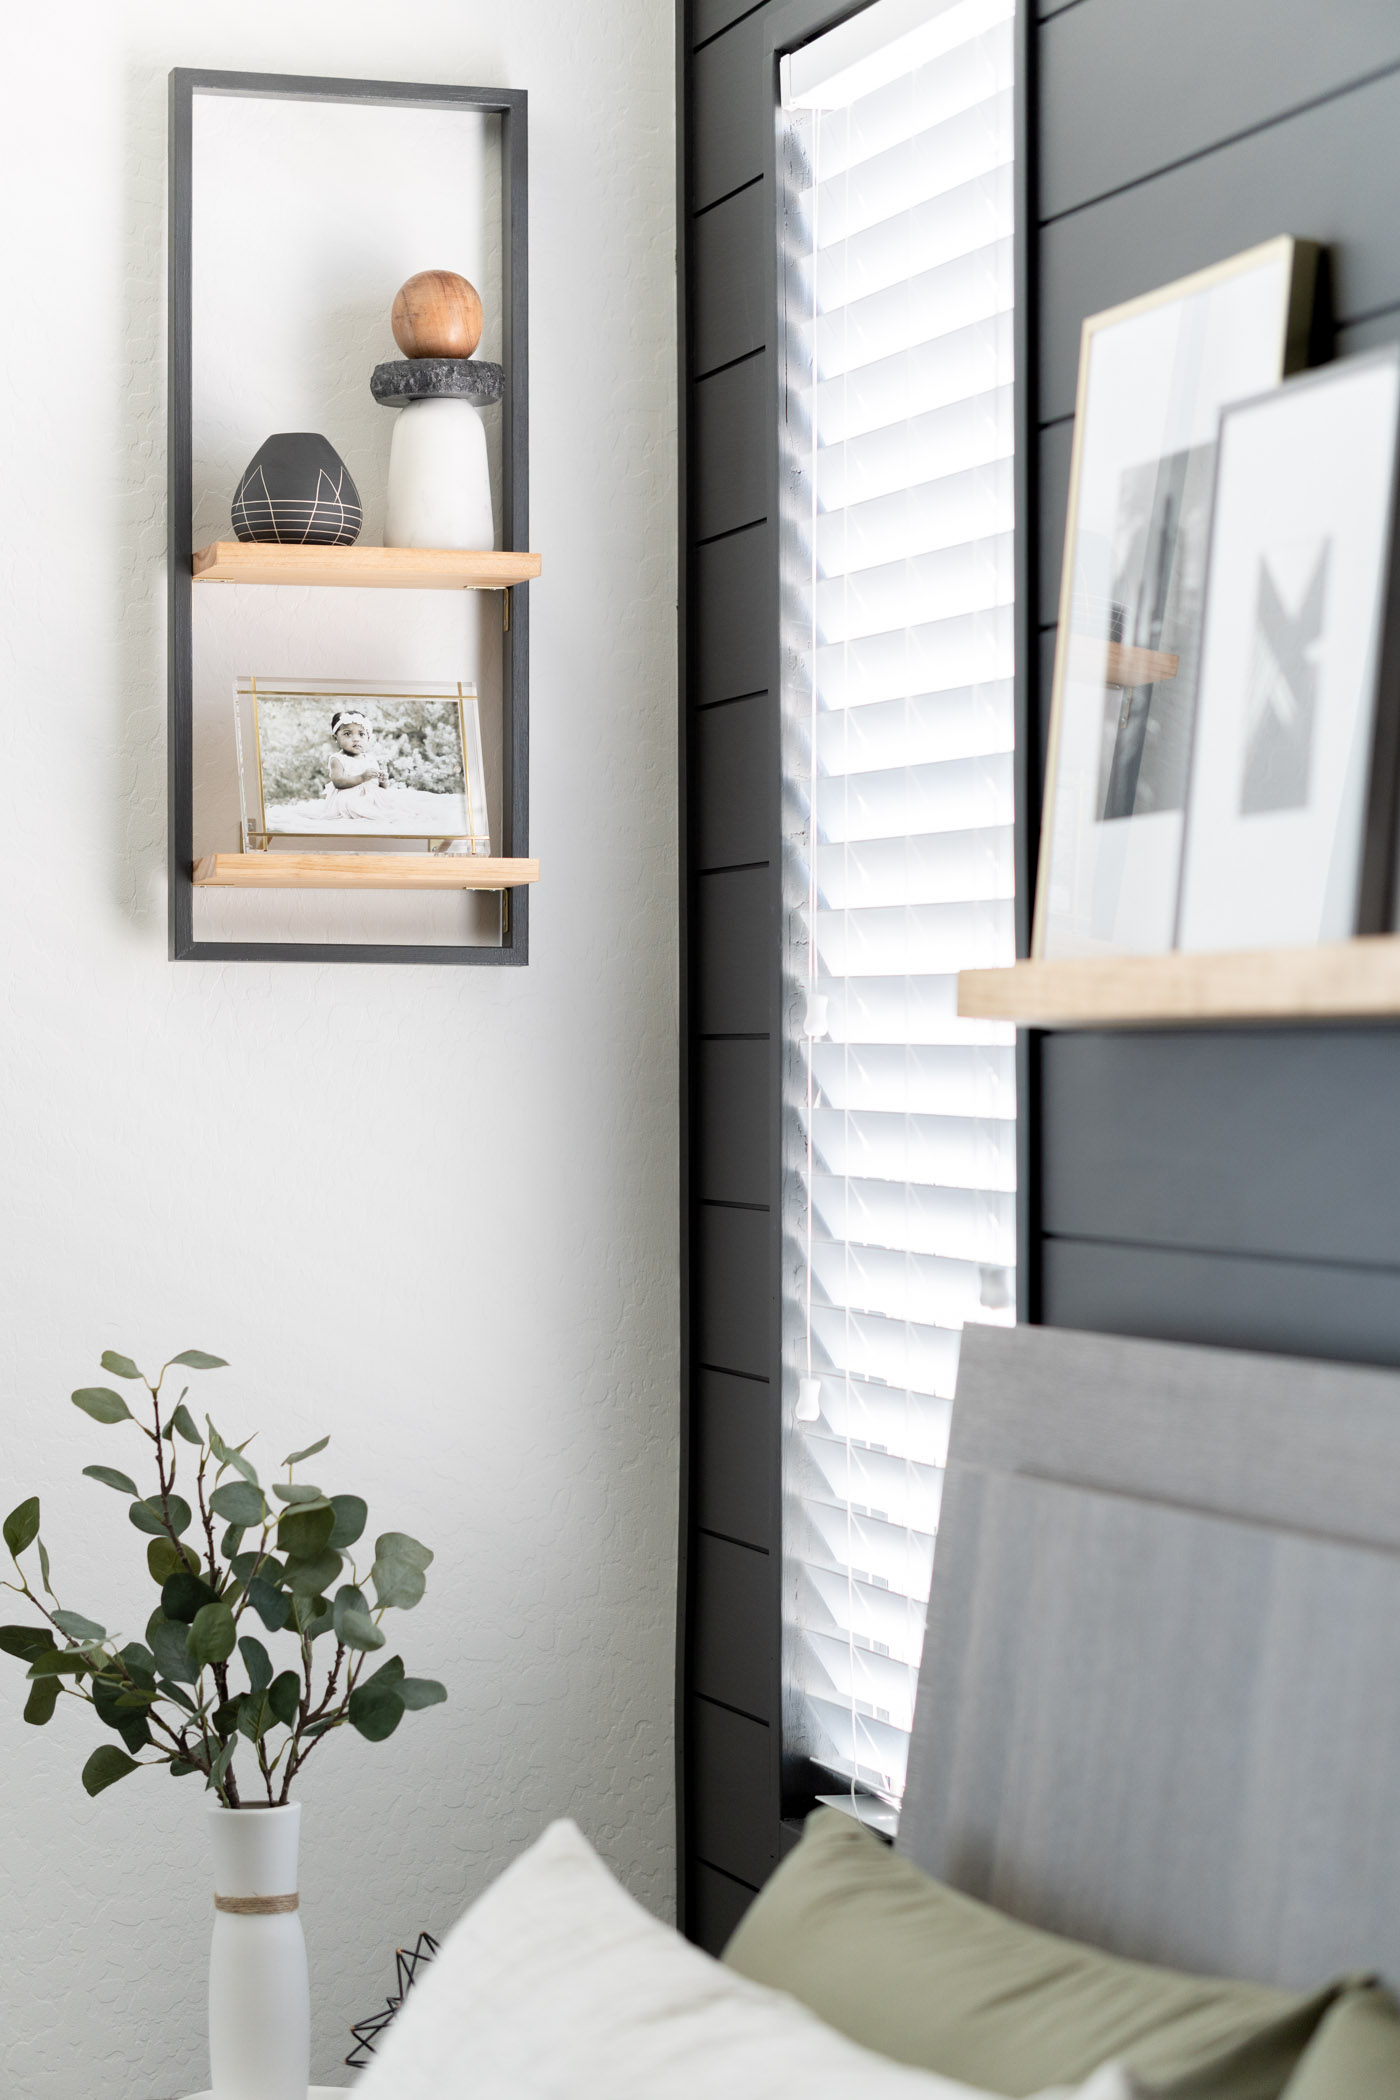
DIY Two-Tone Shelving
One of my favorite DIY projects from our master bedroom makeover is the West Elm inspired framed shelving Hubby created! The frames are painted while the actual shelves are stained, creating an illusion of metal and wood. I’m seriously OBSESSED with these and I love their overall clean, modern look! I must have more of them in our home!

DIY Modern Blanket Ladder
Hubby felt this particular view of our master bedroom needed some contrast against the dark shiplap wall. He came up with the brilliant idea to create a blanket ladder, but of course, a traditional blanket ladder wouldn’t do. He angled the top and bottom rungs of the ladder which added so much more dimension and character! The half-dipped finish was the icing on the cake! A beautiful union of stain and paint!


Bedding
We can’t ignore one of the most important upgrades in our master bedroom – the BEDDING! I’ve been having some of the best sleep of my life on our new bedding set! I searched high and low for the perfect, affordable olive sheets, and would you believe they were on Amazon this whole time?! That’s not even the best part. I paid $34 for the king sheet set and no, a zero isn’t missing! Our Belgian Flax Linen duvet cover, in frost gray, pairs perfectly with the olive sheets. A little pop of brown leather was all that was needed to complete the look!


I cannot believe it’s a wrap my friends! It has been an honor being apart of the One Room Challenge community. I’m so GRATEFUL for the love, support, and encouragement we’ve received along the way! THANK YOU for following our journey and I hope our master bedroom makeover was worth the wait! Be sure to check out the reveals of the Featured Designers and other Guest Participants of this event! Until next time!

Aminah Chung
Gidday Aminah & Bernard!
I have to say, I am absolutely blown away with your design style and love what you have accomplished throughout your home, very clean, fresh, simple, and modern….I’M IN LOVE! It takes quite some doing of artistic abilities to catch my eye, and the two of you HAVE IT! You should be on TV as your style is NOT and so needed!
I am so glad that I stumbled upon you on Pinterest, however, I do have a question…..when I click into each DIY design you have done, I am not seeing a detailed description or video of how you made some of your projects and it would be helpful if I could view right from Pinterest. Do I have to go to your blog each time to view?
I am very excited to make some time and binge your DIY projects…..keep up your amazing work and know you have a loyal follower following you!
Kind regards
P
Hi there! We so appreciate the support! So the purpose of our Pinterest account is to show just enough of our content to drive traffic back to our blog. Therefore, you won’t find detailed videos on Pinterest. Feel free to scroll through our blog for project details. You can also follow us on Instagram @neatly.living where we share our project journeys in stories. Thanks again!
Hi – I just found you guys and you are so inspiring! I am trying to re-organize and decorate my house after most of my kids are a older now. I found you googling “dark accent walls”. I love your style!
I was just looking over your master bedroom reveal – it’s sweet! I love the cubby idea from IKEA. Curious if you recall where the Bench is from pictured in the reveal? It’s not mentioned that I saw. Thanks so much for the inspiration!
Hi Laura! Happy to hear we’re out there on Google! The bench featured in our master bedroom reveal is from Copenhagen Living.
Absolutely love your style!! You guys are so talented 🤩😍
What trim did you use for the edges of the shiplap?!
Hi Taylor, thank you so much! Everything is linked right in this blog post.
LOVE the black shiplap! Did you have any issues with the border trim overhang on the bottom baseboard? Our shiplap is the exact width of our baseboards and I’m worried it’ll look bad if the trim overhangs our baseboards. Would love any insight you might have!
Hi Denise, since this is in our bedroom and we have furniture around, I honestly don’t look at the bottom and it wasn’t a deal breaker for us. You could install the trim first, and have the shiplap line up with it. Then you can caulk any gaps.