
We made a few mistakes with this flat archway project and we hope by sharing them, you’ll be more aware of some of the factors to consider. This flat archway we’re working on essentially serves as a divider, separating our kitchen and dining room from our living room. In Part 1 of our project blog, we’ll share the errors we already made. I wouldn’t be surprised if Part 2 also included more as this has been a learning curve for us.
This post contains affiliate links and we will earn a small commission if you make a purchase using any of our links.

Contrary to what you see on social media, we have A LOT of white walls in our home! The long, flat archway was situated in such an ideal location that we decided to take advantage of that. Once completed, this project will include a slat center to create some visual interest and amplify that WOW factor I’m going for! If you’re interested in our stunning Dining Room Accent Wall, you can read all about it HERE.


What Material We Used for the Casing
We decided to use 3/4 in. plywood for the casing center and pine boards for the sides. Bernard used his plunge circular saw to cut down the plywood to the specific width needed. He then sanded them down so they’d be ready for painting.


We decided to create grooves in the pine board sides for easier assembly and a better fit. We did this by running the pine boards through our table saw, multiple times, until the groove was 3/4 in. wide and about half the thickness of the pine boards. Since this wasn’t a foolproof technique, Bernard did need to clean up the grooves with a chisel.


Project Mistake #1 – Material Choice
So my original plan for this flat archway project was to stain the sides a pretty brown and paint the center black. As we progressed further into the project, I realized staining the sides were no longer an option I wanted to consider because it felt too farmhouse for my vision. Had I decided ahead of time to simply paint the sides, then pine would not have been our chosen material. Instead, we would have used MDF because it’s straighter and less likely to warp than pine. It also has a smoother surface that’s better for painting.


DIY Tip #1
Remove baseboards wherever possible for a more custom-looking finish to your project. Also, dry fit as many times as necessary to prevent costly mistakes.


Painting and Building the Archway Casings
Bernard painted the plywood first before gluing it to the pine board sides. Our process was to build the casings in sections for easy movability and installation. Each casing section is held together only with glue. The paint color we’re using is Iron Ore by Sherwin Williams and you already know how much I love this color!


We did have to add additional plywood to achieve our desired casing height since plywood at our local home improvement store only comes in a maximum height of 8ft.


Attaching Archway Casings
Bernard secured each casing to the archway with 1-1/2 in. screws at the top, middle, and bottom of the casing. Completing this one section did give us a confidence boost to tackle the other 4 casing sections.


Project Mistake #2 – Miscalculations
Conceptually, we knew how we wanted to approach this flat archway project, but as it unfolded there were several miscalculations made. This resulted in us having to troubleshoot and pivot a few times. Our first miscalculation made was forgetting to cut out a section of the plywood at the top of the 2 vertical casings. This was necessary to allow the overhead casing to sit on top of the vertical ones. Fortunately, Bernard was able to use his oscillating multi-tool and hand saw to remove all 4 of those unnecessary pieces.


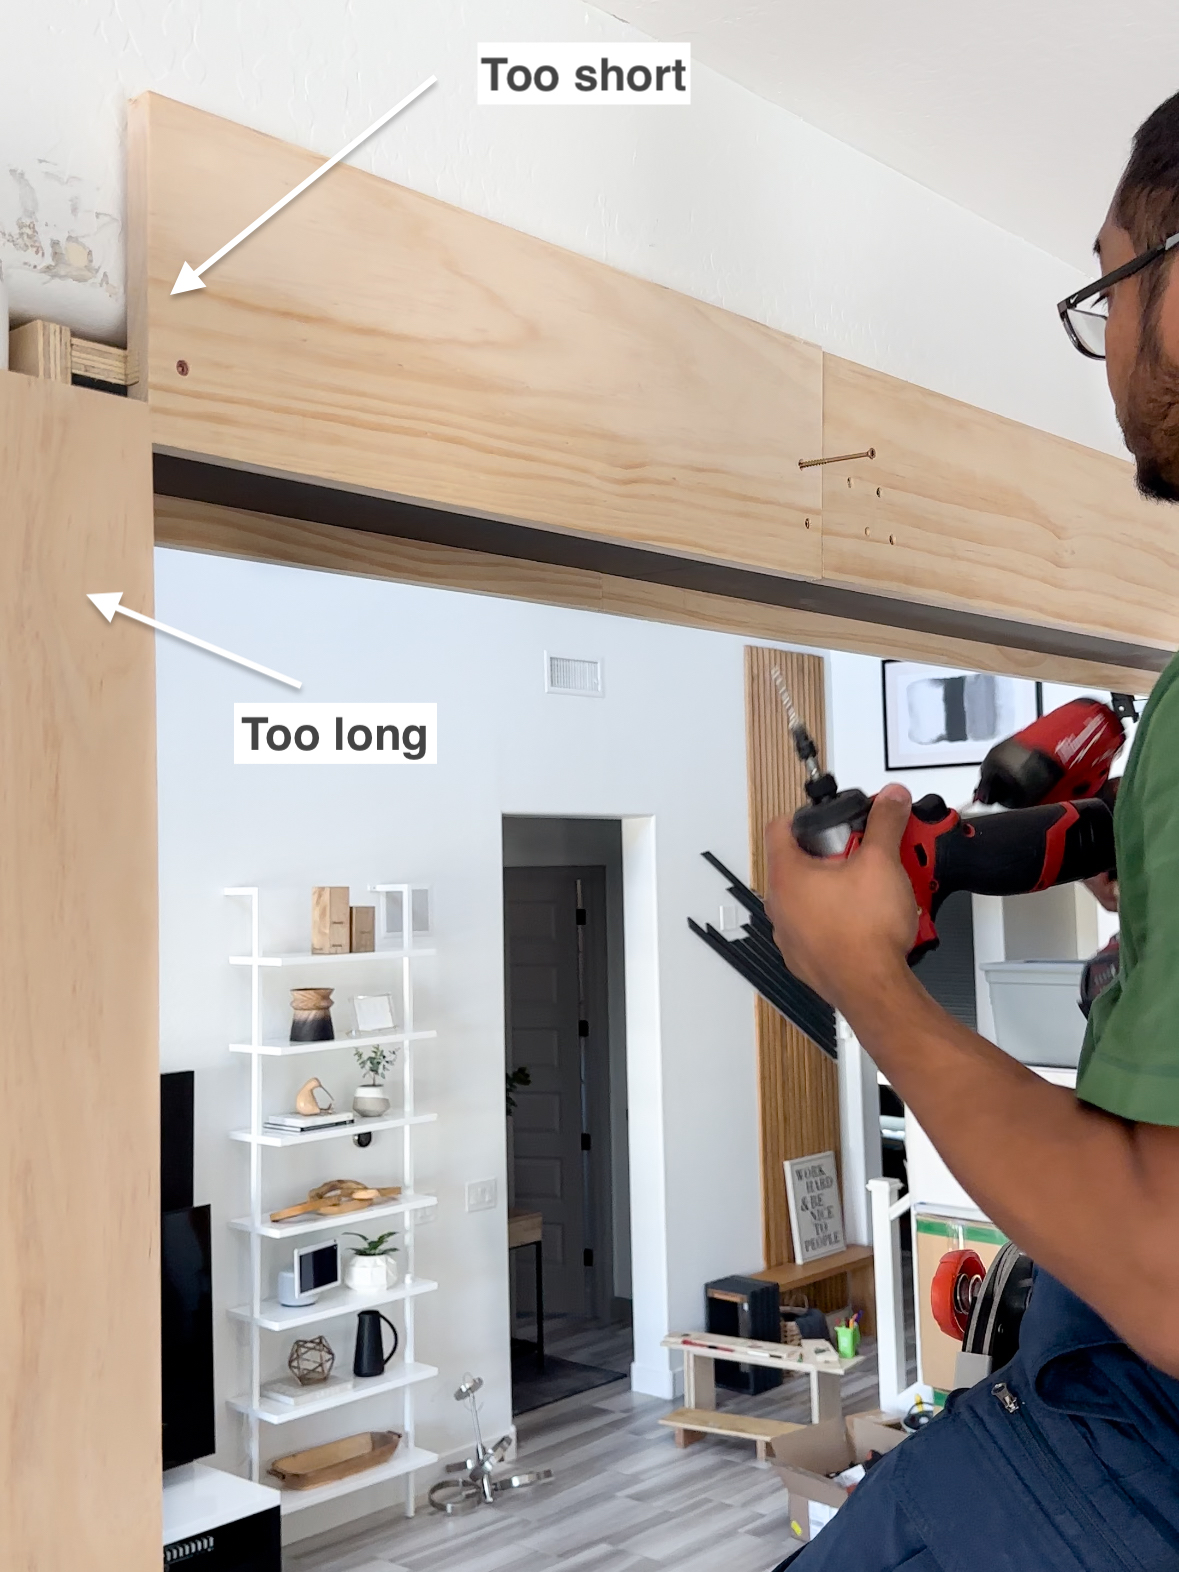
Our second miscalculation made was cutting the pine boards on the vertical casings about 3/4 in. too long. These needed to be a bit shorter so that the pine boards on the overhead casing could have properly extended and sat on top of the vertical casings. We’d already made all cuts by the time we realized this mishap. So, Bernard needed to cut 4 small rectangular pieces of pine boards to fill in those missing sections.

Overhead Archway Casing Installation
While the vertical casings were glued together and then screwed into the archway, we constructed the overhead casings a bit differently. With this flat archway being so large, we knew there was no way it was perfectly straight.


Adjustments would need to be made along the way and so we skipped the gluing. This allowed us to better manipulate both the plywood and pine boards. We used bar clamps to hold the casings in place until they were screwed in. You’ll notice the pine boards we used for the overhead casing were wider because we wanted them to be more prominent.


Flat Archway Project Progress
I have to say I’m so proud of the progress we’ve made on this flat archway project! Although the slats aren’t in yet, I can already visualize how beautiful it’ll be! Yes, we had our share of mishaps but luckily they were all solvable. In our next blog post which will be the REVEAL, you’ll see what paint color we chose for the sides as well as how the slatted detail turned out! If you have any questions, just leave us a comment below.

Until next time friends!
Aminah Chung
I, for one, appreciate your explanations. My husband and I, with our son’s, are building a log cabin, and need to do something for a distinction between our dining room and great room. I have been accenting rooms with black trim. I quite love your idea here
Thank you so much!