
If you have the opportunity to add functionality underneath your stairs, then pull-out drawers are the BEST under-stairs storage solution! They allow you to effectively maximize storage with easier access. Now let’s recap our DIY Under Stairs building process including materials and factors to consider! We also have 5 YouTube videos you can check out for additional project details.
This post contains affiliate links and we will earn a small commission, at no extra cost to you, if you make a purchase using any of our links. Thank you for supporting our journey!

Does Your Under Stairs Allow for This Project?
It’s important to highlight that we already had under-stair access, however, it was being underutilized. So our goal with this project was to increase our storage potential and create a more functional access point. Bernard started by removing the drywall on the inner wall, underneath our stairs. This revealed the studs and electrical wiring he first needed to address before the real work could begin. We did remove 2 studs that were determined to not be structural. As an added precaution, Bernard also reinforced the space by adding 3 – 2×4 studs. One on each side and one at the top (header).
Please do your own research or have a professional assist you with determining if any studs are structural underneath your stairs, before removing them.


Tool Used to Remove Drywall
When it came to removing the drywall for this project, Bernard had great success with an oscillating multi-tool. He was able to maintain really good control, the entire time while cutting the drywall.
You’ll also want to include a leveled base structure as the foundation for this project. We used 2×4 lumber.


Our Building Material of Choice
After both cutouts were made on the outer wall underneath our stairs, Bernard then built two plywood boxes to fit flush into those wall cutouts. Specifically, he used 3/4 in. plywood for the construction. Contrary to what some may think, plywood is a great building material! It holds up well under stress and is less likely to expand or shrink than other lumber. We also weren’t too concerned about warping because of the low moisture content in our home. You can also apply a polyurethane sealant as an added protection.


How to Cover Up Plywood Edges
One disadvantage to using plywood in your projects is the exposed, unfinished edges. A simple solution is to cover those edges in a process called edge banding. Edge banding is the easy technique of applying a thin layer of solid wood veneer to plywood edges, using heat, for a smooth and more finished result. These veneer strips come in a variety of wood types and sizes. Specifically for this project, we used 3/4in. birch wood veneer to cover the edges of the plywood boxes.


Building Our Under Stairs Storage Drawers
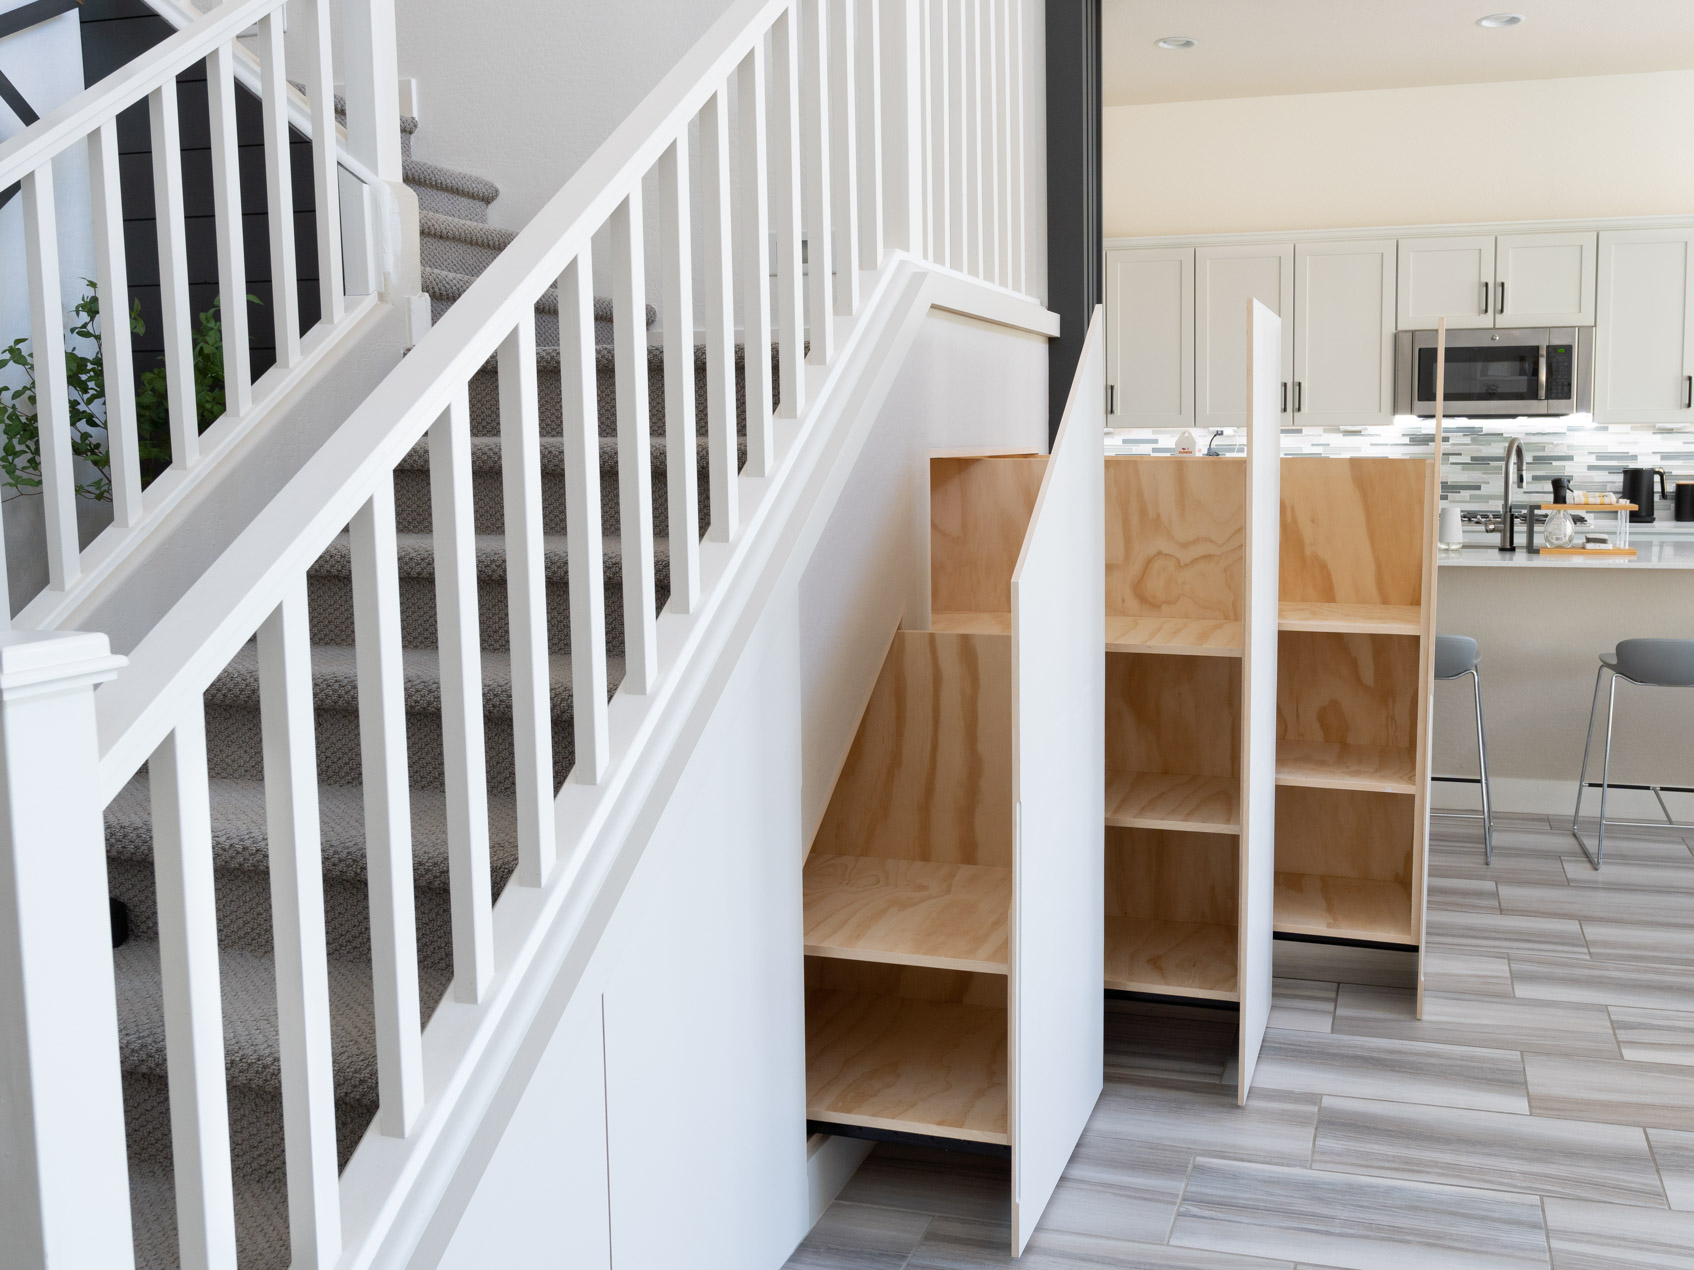
With the plywood boxes edge banded and secured (screwed into the base structure) underneath the stairs, it was then time to build the actual under-stairs storage drawers. Bernard again used 3/4 in. plywood to construct these vertical drawers. He secured them together with a combination of wood glue and 2 in. construction screws.


It’s important to note that the final height of each storage drawer is determined by the type of drawer slides used and the height they require for installation.


The Drawer Slides We Used
This was by far the most asked question when we revealed our completed DIY Under Stairs Pull-Out Drawers! We chose an under-mount style drawer slide because the installation process looked fairly easy and it was! We purchased 40 in. heavy-duty under-mount drawer slides with a 260 lb load capacity, per pair.


How We Installed the Drawer Slides
Regarding the larger plywood box with the two storage drawers, Bernard chose to secure the under-mount drawer slides to the storage drawers first, and then to the plywood boxes under the stairs. You’ll notice in the images below, how the final height of the under-stairs storage drawers changed with the addition of the under-mount drawer slides.

For the single storage drawer, Bernard decided to install the drawer slides first to the plywood box, and then underneath the storage drawer.


Pull Out Drawer Shelving
For maximum storage, we installed 2 shelves in each of the 2 larger drawers and 1 shelf in the smaller drawer. Each shelf was constructed from 3/4 in. plywood. Bernard also attached a piece of pine board under each shelf to help with warping. The shelves were screwed into the drawers from underneath and from both sides.


of drawer


Edge Banding Plywood Drawers and Shelves
For that clean, finished look to our project, Bernard went ahead and edge-banded all of the plywood shelves as well as the drawer edges. We found a little heat press online that worked really well for adhering the wood veneer to the plywood.


Cleaning Up the Gaps
Once the shelves were installed, it was time to tackle some finishing work for a more professional end result. Bernard inserted 3/8 in. backer rods into the larger gaps between the wall and the plywood boxes. Backer rods are flexible pieces of foam that provide a “backing” or stop point when applying caulk, joint compound, or any other filler product. He then applied joint compound over all the gaps to fill them in and followed up with some light sanding.


Installing Stair Trim
In preparation for the pullout drawer doors, we added some MDF trim. This helped with creating that hidden drawer look we were going for. Our plan was to install the drawer doors over the baseboards which meant 3/4 in. thick MDF trim wouldn’t be enough. So, Bernard glued 2-3/4 in. MDF boards to create 1-1/2 in. thick MDF trim for the stairs.
The trickiest part of this stair trim was determining the appropriate cutting angle. We first used an angle finder to figure out the angle where the horizontal and diagonal trims would meet. We then plugged that number into a miter angle calculator and it gave us the exact angle we needed to make the 2 miter cuts.

Adding a Fresh Coat of Paint
I decided to go with a simple, monochromatic look for the finished under-stairs storage. It made sense to paint the exterior wall first before attaching and painting the door panels. The paint color we used was Agreeable Gray by Sherwin Williams. It’s a very pretty and light gray with a warm undertone.


Creating and Installing Door Panels
We used 1/2 in. thick MDF boards for the door panels and while it’s heavier than plywood, it’s also straighter and worth the trade-off for this project. Bernard also added a simple router detail for a little added character.


We needed several bar clamps to support and hold each door panel in place, while Bernard secured it. Each door panel was screwed into the pull-out drawer from the inside, eliminating the need to fill any screw holes.


We also edge-banded the MDF doors, using 1/2 in. wood veneer, to protect the sides.


In addition to the 3 door panels, we also added 2 faux panels to create a more uniform look to the space. Bernard attached 3 pieces of 3/4 in. thick MDF strips behind the faux panels, so they would line up with the other door panels.

depth as the real door panels

Painting the Door Panels
Again, in keeping with a simplistic finish, Bernard also painted the door panels in Agreeable Gray by Sherwin Williams.

DIY Under Stairs Pull Out Drawers – VIEWS
I can’t tell you how excited I am to have such functional storage we can use for extra household items! Bernard was very proud of this project and how well it all came together! I think it pairs perfectly with our DIY Slat Casing Project and I love the color contrast!


Regarding the drawer shelves, many people wanted us to paint them but we prefer the natural look. With storage bins and baskets on the shelves, painting them would have been a waste of time and supplies. Instead, I applied several coats of matte polyurethane to protect the plywood but also maintain that natural finish.
Under Stairs Storage Containers
I couldn’t believe our luck when we found the PERFECT set of storage bins and baskets to organize these drawers! They are the exact fit we needed. I’m using some water hyacinth baskets to store paper towels and each one perfectly fits 4 paper towels. For the rest of our household items, I’m using these modern, plastic bins in 3 different sizes. Since I opted for a closed storage system, I’m using these black, reusable clip-on labels, so we can find what we need without having to open each bin.


We’re making great progress turning our builder-grade house into our dream home. Each completed project adds character, and uniqueness, and truly sets our home apart. Hope you’ve enjoyed following along with this under-stairs transformation as much as we’ve enjoyed sharing the process.

Until next time friends!
Aminah Chung
Very nicely done. You have a beautiful home.
Thank you so much!